



















Kitchen
Easy Homemade Sweet & Savoury Treats Using Silicone Freezer Moulds


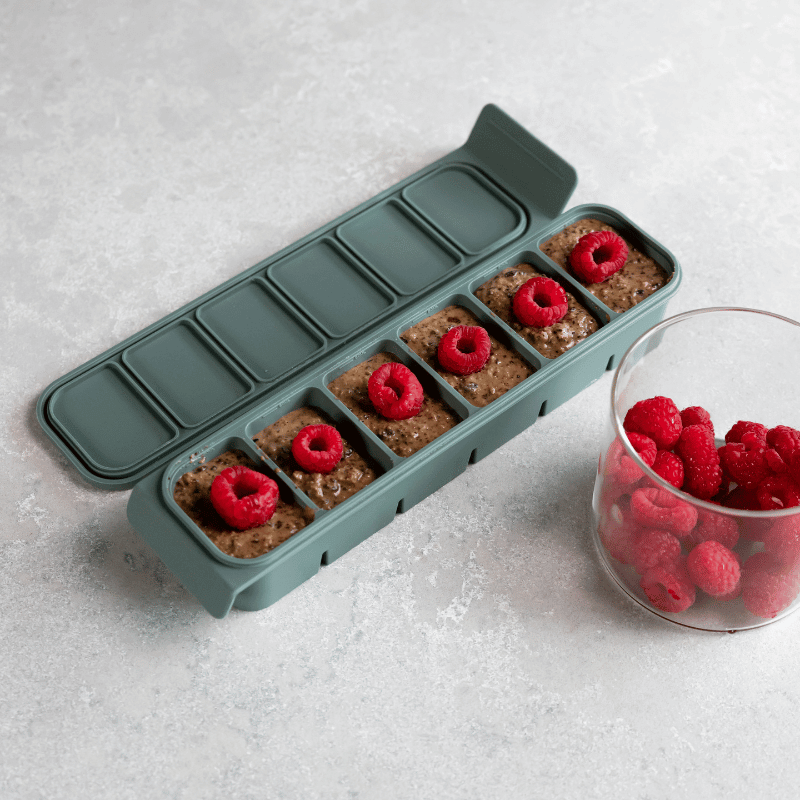
Our team are obsessed with opening our freezers and seeing rows of homemade snacks ready to go. No crinkly wrappers (WIN). No last-minute supermarket dash for lunch box snacks! No wondering what’s actually in them and how many preservative numbers they have.
Just tasty homemade treats that are portioned perfectly and waiting to make your week easier. Our Silicone Freezer Trays were designed for exactly this and we're going to show you how!
Whether you’re packing lunchboxes, prepping afternoon snacks, or making breakfast easier, here’s how to use your freezer moulds to create delish sweet and savoury treats 🤤
Why Freezer Treat Prep Works
Freezing isn’t just for leftovers (although we do swear by that too). It’s one of the easiest ways to:
- Reduce food waste
- Avoid packaged snacks
- Save you time making one snack at a time
- Save serious money
- Control ingredients
- Make healthier options convenient
If you’ve already explored our guide on Creative Ways to Use Silicone Freezer Moulds or our smoothie prep ideas here → Healthy Smoothie Recipes & Prep Tips. You’ll know the magic is in getting prepared!
Why Silicone Freezer Trays Make It Easy
Our Silicone Freezer Trays are designed to make treat prep simple and stress-free. They're available in a heap of sizes and colours (in fact, a whole new bunch of colours are on preorder:)
- 2 Portion
- 4 Portion
- 6 Portion (100mL)
- 6 Portion (50mL)
- 12 Portion (COMING SOON IN APRIL!!)
Made from premium LFGB-certified Platinum Cured Silicone, they’re:
- Easy to pop portions out
- Airtight to reduce freezer burn
- Stackable to save space
- Oven safe up to 200°C
- Dishwasher safe
- Available in multiple colours to separate allergens or organise meals
The new 12 Portion tray that's on its way is perfect for sweet or savoury bite-sized treats and is designed for 12 portions of around 25 ml each — ideal for snack-sized treats that pop straight out of the mould. PREORDER NOW!
Sweet Homemade Treats
Sweet treats can be quick, wholesome, and just enough to brighten a busy day.

1. Bliss Squares (No Rolling Required)
Bliss balls are lovely. Bliss squares are quicker.
Pressing the mixture straight into your mould means no sticky hands and perfectly portioned pieces every time.
You’ll need
-
1 cup dates
-
1 cup nuts of choice
-
2 tbsp cacao
-
1–2 tbsp coconut oil
How to make
-
Blend until sticky and combined.
-
Press firmly into each mould cavity.
-
Freeze until set, then pop out.
They stack better, freeze beautifully and are ready whenever you are.

2. Quinoa Chocolate Bites
A little chocolate, made more nourishing. These bites are crunchy, satisfying, and easy to keep on hand for whenever you need something sweet.
You’ll need
-
1 cup cooked quinoa, cooled and well drained
-
¾ cup dark chocolate, melted
-
1 tbsp maple syrup (optional)
-
1 tbsp nut butter (optional, for extra richness)
-
Pinch of sea salt
How to make
- If your quinoa is very moist, spread it on a tray and let it air-dry slightly so the bites set well.
- Melt the dark chocolate gently over low heat or in short bursts in the microwave.
- Stir in maple syrup and nut butter if using.
- Fold the cooked quinoa into the melted chocolate until evenly coated.
- Spoon the mixture into your silicone mould, pressing down gently to compact.
- Refrigerate or freeze until firm.
- Pop out and store in the fridge or freezer.
They’re proof that a small square can feel indulgent and nourishing at the same time.

3. Smoothie Bombs
Because mornings don’t always go to plan.
You’ll need
-
Your favourite smoothie base (banana, berries, spinach, yoghurt)
How to make
-
Blend a larger batch.
-
Pour into your mould and freeze.
-
In the morning, pop out 2–3 cubes, add milk and blend.
It turns breakfast into a 60-second job.

4. Baked Granola Bar
Yes, you can bake in them too.
Our silicone freezer moulds are oven safe up to 200°C, which means no baking paper and no disposable liners. Just evenly portioned squares that pop straight out.
You'll need
-
2 cups rolled oats
-
½ cup chopped nuts or seeds
-
⅓ cup honey or maple syrup
-
¼ cup coconut oil, melted
-
¼ cup nut butter (peanut or almond work well)
-
1 egg
-
1 tsp vanilla extract
-
¼ tsp salt
-
¼ cup dark chocolate chips or dried fruit
How to make
- Preheat oven to 170°C.
- In a large bowl, combine oats, nuts or seeds, salt, and chocolate chips (if using dried fruit, add after baking).
- In a separate bowl, whisk honey (or maple syrup), melted coconut oil, nut butter, egg, and vanilla until smooth.
- Pour the wet mixture into the dry ingredients and stir until evenly coated.
- Press firmly into your silicone mould, compacting well so the bars hold together.
- Bake for 18–22 minutes, or until lightly golden around the edges.
- Allow to cool completely before popping out of the mould.
Store in an airtight glass container for a few days, or freeze extras for later.

5. Raspberry & Coconut Muffin Bars
Soft, fruity, and lightly coconutty!
You’ll need
-
1 ½ cups plain or self-raising flour
If using plain flour: add 1 ½ tsp baking powder + ¼ tsp salt -
½ cup desiccated coconut
-
½ cup maple syrup or honey
-
1/3 cup coconut oil, melted
-
1 large egg
-
½ cup milk (dairy or plant-based)
-
1 tsp vanilla extract
-
1 cup fresh or frozen raspberries
How to make
- Preheat oven to 180°C.
- In a large bowl, combine flour, desiccated coconut, and baking powder/salt if using plain flour.
- In a separate bowl, whisk together egg, milk, maple syrup (or honey), melted coconut oil, and vanilla.
- Pour the wet ingredients into the dry and mix gently until just combined.
- Fold in raspberries carefully to avoid breaking them too much.
- Spoon the mixture into your silicone mould, smoothing the tops.
- Bake for 20–25 minutes, or until golden and a skewer comes out clean.
- Allow to cool before popping out.
Enjoy fresh, and pop the rest in the freezer to grab when you need them.
Savoury Homemade Treats
Not every bite needs to be sweet. Savoury treats can be simple, satisfying, and ready when life gets busy.

1. Mac & Cheese Squares
A little comfort in a square. Hearty, familiar, and portioned.
You’ll need
-
2 cups dried macaroni
-
1 tbsp butter
-
1 tbsp plain flour
-
1 cup milk
-
1 ½ cups grated cheddar
-
¼ tsp mustard powder (optional)
-
Salt and cracked pepper, to taste
-
¼ cup grated cheese, extra (for topping)
How to make
- Preheat oven to 180°C.
- Cook macaroni in salted water until just al dente. Drain and set aside.
- In a saucepan over medium heat, melt butter. Stir in flour and cook for 1 minute.
- Gradually whisk in milk, stirring until thickened and smooth.
- Remove from heat and stir in grated cheddar, mustard powder (if using), salt, and pepper.
- Fold the cooked macaroni into the cheese sauce until evenly coated.
- Spoon into your silicone mould, pressing down gently to compact.
- Sprinkle a little extra cheese on top.
- Bake for 15–20 minutes, until lightly golden and set.
- Cool completely before popping out of the mould.
Store in the fridge for a few days or freeze extras for later. Reheat in the oven or air fryer to bring back that golden top.

2. Feta & Sundried Tomato Quiche
A savoury bake that feels a little special, yet easy enough for any day of the week.
You'll need
-
6 eggs
-
¾ cup milk (dairy or plant-based)
-
½ cup sundried tomatoes, finely chopped
-
¾ cup feta, crumbled
-
½ cup baby spinach or chopped silverbeet
-
1 tbsp olive oil (if using dry-packed sundried tomatoes)
-
¼ tsp cracked black pepper
-
Optional: 1 tbsp chopped basil or parsley
How to make
-
Preheat oven to 180°C.
-
In a large bowl, whisk together eggs and milk until smooth.
-
Stir through sundried tomatoes, feta, spinach, olive oil (if needed), pepper, and herbs.
-
Pour evenly into your silicone mould, filling each cavity about three-quarters full.
-
Bake for 20–25 minutes, or until set in the centre and lightly golden on top.
-
Allow to cool completely before popping out of the mould.
Store in the fridge for a few days or freeze extras for later. Reheat gently in the oven or microwave until warmed through.

3. Cheese & Cherry Tomato Frittata Squares
A simple bake that works warm or cold and keeps well for the days ahead.
You'll need
-
6 eggs
-
¾ cup milk (dairy or plant-based)
-
1 cup grated cheddar or tasty cheese
-
1 cup cherry tomatoes, halved
-
2 tbsp chopped chives or basil (optional)
-
Salt and cracked pepper, to taste
-
Olive oil, for brushing if needed
How to make
- Preheat oven to 180°C.
- In a large bowl, whisk eggs and milk until smooth.
- Stir through grated cheese, herbs (if using), salt, and pepper.
- Pour the mixture evenly into your silicone mould.
- Gently press halved cherry tomatoes into each portion, cut side up.
- Bake for 20–25 minutes, or until set in the centre and lightly golden on top.
- Allow to cool completely before popping out of the mould.
Store in the fridge for up to 3 days, or freeze portions for later. Reheat gently or enjoy at room temperature.

4. Cheese & Vegemite Scroll Squares
A simple classic that never goes out of style.
You'll need
-
2 cups self-raising flour
or 2 cups plain flour + 3 tsp baking powder + ½ tsp salt -
1 cup Greek yoghurt
-
2–3 tsp Vegemite (adjust to taste)
-
1 cup grated cheddar cheese
-
1 tbsp milk, for brushing (optional)
How to make
-
Preheat oven to 180°C.
-
If using plain flour, stir in baking powder and salt first.
-
Add yoghurt and mix until a soft dough forms. Bring together gently with your hands.
-
Roll or press the dough into a rectangle on a lightly floured surface.
-
Spread a thin layer of Vegemite evenly over the dough. A little goes a long way.
-
Sprinkle generously with grated cheese.
-
Roll up tightly, then slice into 12 pieces.
Alternatively, press the dough into your silicone mould first, spread with Vegemite, top with cheese, and bake as squares. -
Place portions into your silicone mould and bake for 18–22 minutes, or until golden and cooked through.
-
Allow to cool before popping out.
Store in the fridge for a few days or freeze extras for later. Reheat gently in the oven or air fryer to bring back that fresh-baked texture.

4. Mexican-Style Dip
Small, flavour-packed portions that make meal prep and snack time easier.
You'll need
-
1 cup cooked black beans, drained and rinsed
-
½ cup roasted red peppers (jarred or homemade)
-
1 small garlic clove
-
1 tbsp lime juice
-
1 tsp olive oil
-
½ tsp ground cumin
-
¼ tsp smoked paprika
-
Salt to taste
-
Optional: fresh coriander or a small chilli for a kick
How to make
- Blend all ingredients in a food processor until smooth. Adjust seasoning to taste.
- Spoon into your silicone mould, filling each cavity evenly.
- Freeze until firm, then pop out and store in an glass container.
Small portions, big flavour:
-
Stir into grains or eggs for a quick twist
-
Spread on toast or wraps for an easy snack
-
Top tacos, burrito bowls, or roasted vegetables
-
Serve with tortilla chips, veggie sticks, or crackers
Start Small This Week
Don’t try to prep everything! It's about doing one or two things a week and building up your freezer meal prep stack. Try with one sweet and one savoury treat to get started! Then build from there.
At the end of the month, we’ll be sharing our Ultimate Freezer Mould Guide, breaking down every size and all the ways you can use them to make your weeks easier...it's going to be EPIC. Make sure you're signed up for updates!